A mixed media piece

A mixed media piece

Monday 13 October 2014

Book Of Halloween Little Book 3


Hi everyone here is the third and final part to the

All supplies can be purchased through the artistic stamper 
please see the list over on the original blog


The front covers are gray board put through a machine with the Poison
Texture fade. I coloured this with Prussian Blue, english red oxide, burnt sienna , 
Carbon Black, Gold  and interference gold Deco Art Media Fluid Acrylics Range. 


I didn't put the put any antiquating cream on this as I loved the
effect that the iridescent gold  gave to the cover.
Have I said yet how I really LOVE!!!! this 
range it is just amazing.


I coloured three tags with distress ink in the following colours Old paper, 
Antique Linen, Scattered Straw, Gathered Twigs, Vintage Photo,
 Black Soot and Faded jeans. Once coloured I spritzed lightly
 with water to activate the ink.


I rolled out Fimo clay and stamped the skull from the Tim
Holtz apothecary set and the Happy Halloween.


This is a close up of the inside of the covers. and one and 
a bit of the inside pages.


Once I had baked the clay in the oven I used the the antiquating 
cream in patina green and a touch of white. I highlighted
the peaks with treasure gold.


Using the stamps from the Tim Holtz classic plate I used
the compass stamp and stamped randomly over the
page.


The stamps used on these two pages are off the halloween plate 
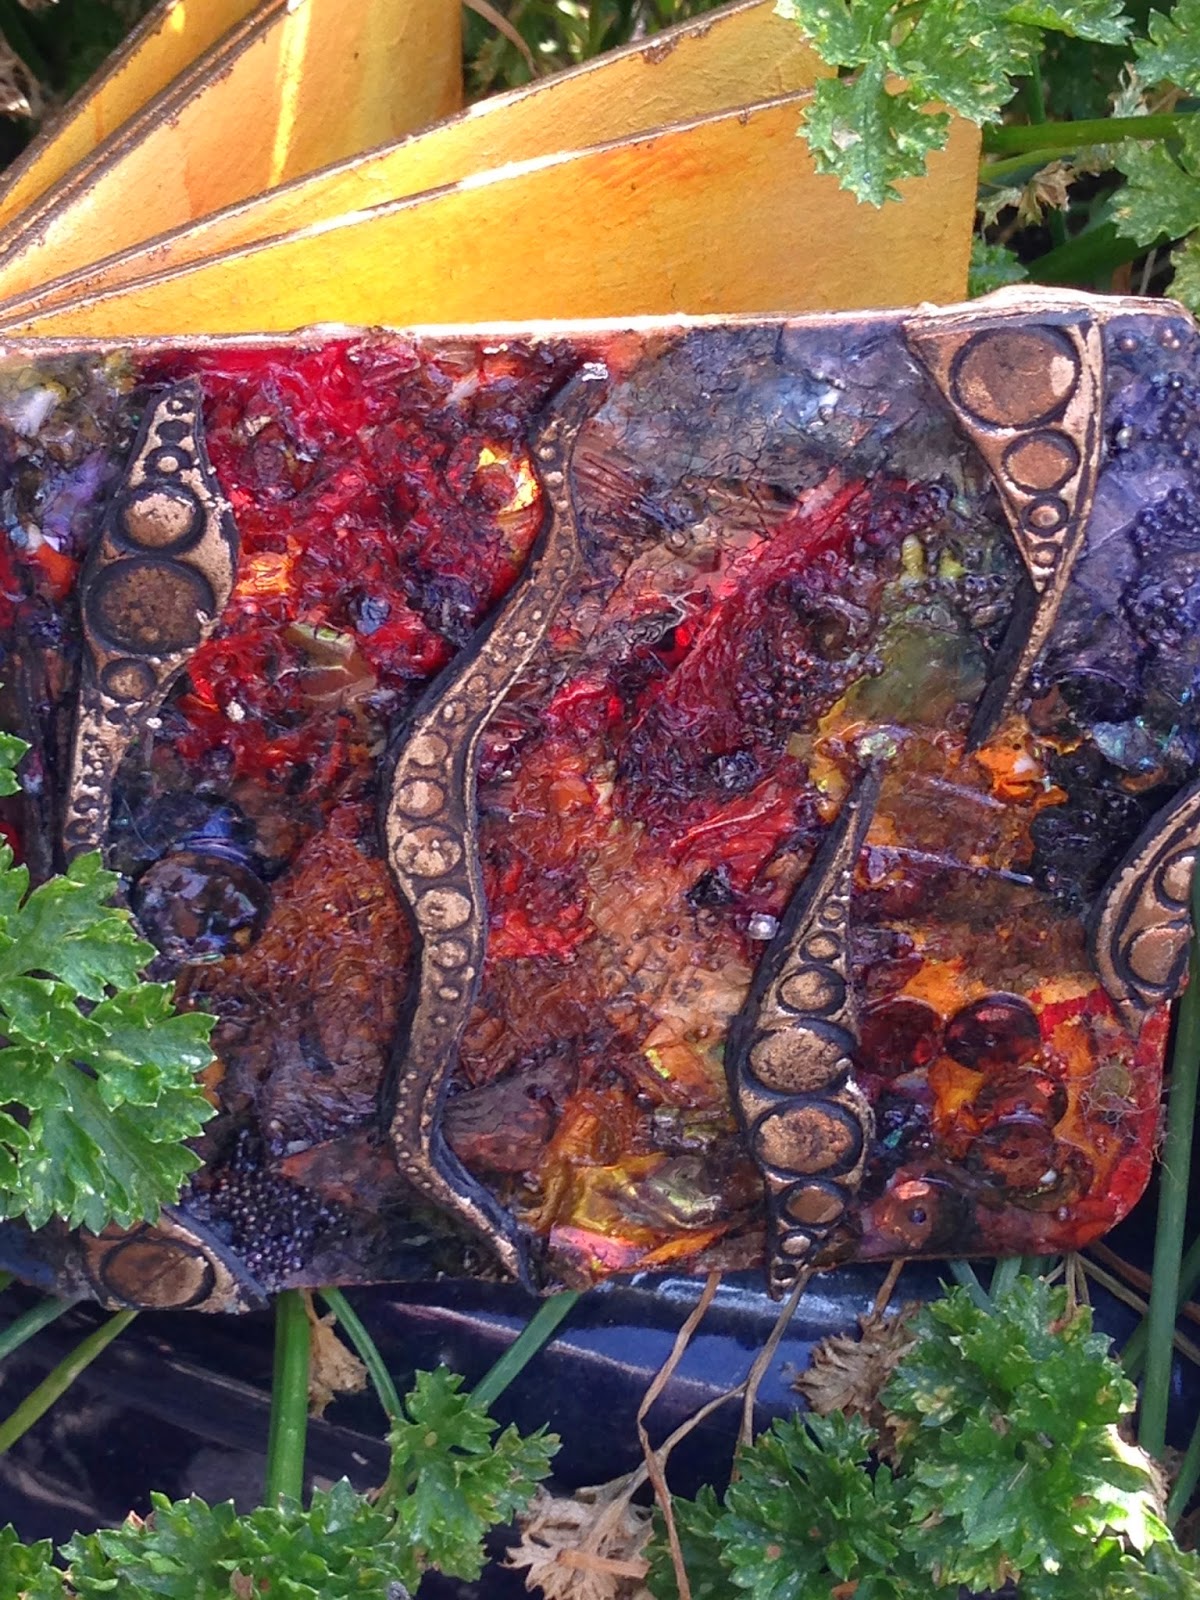
and the classic plate the bats are off the blueprint plate.The 
circles are covered in gilding flakes and surrounded 
by small beads.


This page has the compass from the indigo blue plate 
stamped into black Fimo clay then coloured with antiquing cream 
then highlighted with treasure gold.


Bats done the same way with Fimo clay diamante surrounded 
with small beads. Long strip of clay stamped with the
 lost coast bubbles stamp.


Indigo blue stamp die cut cogs and pale blue diamante
bead placed in the centre.


A close up of the same piece.

 
Another close up of the second page.


The Cob web was made by using my hot glue gun and free hand running the 
hot glue into a web. I then highlighted with treasure gold. Then Prussian
 blue Brusho sprinkled lightly then gently spritzed with water.


 The Tomb stone was from the blueprint stamps using
Fimo clay again. I also used Frantage embossing
powders in shabby white.


Another photo of the bat, spider and web 


Inside the back cover without the brusho but brushed with
treasure gold.


Filigree corner coloured with antiquing cream and knocked back
again treasure gold was applied.


The back cover I stamped the writing from the halloween plate
into black Fimo clay and backed in the oven once cooled
I used the antiquating cream in the verdi and then
highlighted with treasure gold.


This is the bat from the blue prints set stamped into the Fimo clay and 
highlighted with treasure gold. I used my bind it all machine to 
compile the book.


That's it folks I hope you enjoyed reading about it as much as
 I enjoyed making it. Thank you for stoping by and please
feel free to leave a comment or two.
Cheers Dee x


The Book of Halloween


Hi everyone this is a sneaky peek of my halloween 
project over at the Artistic stamper.

 
pop over to


To see how I created this project.


This is the third piece of the project.


See the next post to see whats in the book
 & to see how to make it how?


Monday 6 October 2014

The Little Spell Book


Hi everyone sorry its been a while getting in a working
routine again and working out how to 
craft alongside. 


This is a little book that hasn't been filled yet, I thought
 I would call it the Little spell book as Halloween 
will soon be upon us.


This was made from a children's story book that I altered by peeling 
of the cover and glueing different pieces to it.


Friday 3 October 2014

Post Card From Maida.Hill


Hi everyone here's a sneaky peek at my next project
for the Artistic Stamper Design Team.


Pop over to The Artistic Stamper Blog to see how.
Cheers Dee x

Friday 26 September 2014

Altered Bottle


Hi everyone! 


I hope you are all well I am sorry for the delay in this post
as I have been busy with
my real job!!


For a while I have been toying with the idea to Alter a bottle. 
I decided I would have a go and here is the result.


This was a small bottle that we had so I covered it with gesso.


Once dry I used alcohol ink dabbed on with a felt applicator


I used ranger alcohol inks in denim and terra cotta.


I rolled out black clay and stamped into it.


I cut the clay and wrapped it round the bottle then baked 
it in the oven.


I used a heart cutter and placed that in the middle of the bottle.


I used treasure gold to highlight the clay.


I was really pleased with the results and hope you are to
Please let me know what you think,
 by leaving me a comment.
Cheers Dee x


Tuesday 23 September 2014

Measured Time Part Two Time Flies


Hi everyone! here is a Sneaky peek at my second part of 
Measured Time. To see the full instructions pop over


Please feel free to leave me your comments
Hope you enjoy 
Cheers Dee x

Friday 12 September 2014

Butterflies & Tags


Hi everyone! A big thank you for dropping by to read
my blog. As always with my work this piece has 
the odd clock face I think its an obsession 
now. I started with a black tag to which
 I glue some craft paper.


I then applied grunge paste with a metal spreader or
scraper down the centre of the tag.
 I allowed this to dry.


I think there may be many!! photo's of this one. 


I put grunge paste through the Tim Holtz cargo stencil 
down the left hand side.


To the top right I put grunge paste through the ledger 
stencil from CW


Out of thick black card I used the Tim Holtz pediments 
dies to cut out the topping on the tag.


I used old brass square and round sequins to embellish
 the top centre next to the clock.


The butterflies were stamped onto craft card they are
Tim Holtz stamps from the field notes plate.
They were clear embossed, then coloured
 with blue gelleto's and covered in rock
candy distress stickles.


The cargo numbers and ledger were coloured with geleto's 
and brushed gentle with treasure gold. 


The base of the tag I used the stamps from Tim Holtz 
Apothecary and steam punk plates.


The clock faces are from the artistic stamper 
time and keys plate.


The top was rubbed with treasure gold and a small clock 
was stamped on magnolia card and then a brass ring
used and filled with glossy accents. The ruler 
was stamped onto white card and is an
 indigo blue stamp.


Everything was backed onto craft card and holes were punched 
brads and eyelets used to fix the brass chain. the sides were
distressed with Vintage photo and black soot.
I hope you all enjoyed this post & don't feel
 shy let me know what you think.
Cheers Dee x


Wednesday 10 September 2014

Measured Time


Hi everyone! here's a sneaky peek at a two part piece
 for the Artistic Stamper you can pop over to their 
blog, to see how.  Click on the logo on the right
hand side of this blog.


Thank you for popping by feel free to 
leave a comment.
Dee x

Saturday 6 September 2014

Gothic Icons


Hi! hope you are all well and enjoying the weekend. I had these frames in 
my stash so decided to do a project with them.


Firstly I stenciled grunge paste through a stencil.


I did this across all three stencils so the stencil pattern would
flow or line up once they were hung.


Once dry I used fresco paints over the entire frame.


Again once dry treasure gold was used to highlight the
texture.


The images were done using the same technique as my gothic lady
post.


Sorry lots of photo's.


From different angles


I have had a job fitting all three in one photo.
No kids around to show me how!!


That's it from me for today thank you for popping by
and taking time to read this post.
please feel free to let
me know what you 
think.
Dee x


Wednesday 3 September 2014

Earl's


Hi everyone here is a sneaky peek at my latest project
for The Artistic Stamper design Team Blog
so why not pop over and see how.


Thanks for popping by you can access the blog by clicking on the 
logo on the side of my blog.
Happy Stamping!
Dee x